
Hello all,
Today, I will be covering
how to paint miniature figures for boardgames, covering some of
the materials that you will need, and some basic tips along the way!
As I may have mentioned from time to time, I am an avid board game player
myself. While not all the games I enjoy playing have figures like these, I
would like those that do have figures to look as nice as possible in order to
enhance my gaming experience. What better way to achieve that then to
paint these models very easily myself, and you can do it too!
In this photo montage, I
painted the a "Warrior" from the classic board game: "Talisman
4th Edition." If you have never played this game, it is a light-hearted
and fantasy-themed game where you roll dice to move around a large board, find
loot, and battle monsters to become the ruler of Talisman!
Here is a link to where you can buy this game on Amazon:
Materials List with Amazon links:
- Assorted Paintbrushes
- Miniatures
- Acrylic Craft Paint: I recommend White, Brown, Gold, Silver, Blue, Red, and Yellow to start. (You can mix the other colors as you need them: Red + Yellow = Orange, Blue + Yellow = Green, Red + Blue = Purple.)
- Flat Black Spray Paint (must say: bond to plastic). Here is the one I used:
- Clear Spray Paint (must say: bond to plastic). Here is the one I used:
- Cardboard Box
- Drop Cloth
- Paper Towels
- 2 Disposable Water Cups (One we will use for washing brushes and the other we will use for the brown wash that we will make!)

To start, I spray painted the figure
a flat black with spray paint. It came as a very boring grey. Make sure that the spray paint that you buy specifically says it will bond to plastic! I did this outside into a cardboard box due to
the smell + less mess. Use only quick, short burst of paint and keep the can
moving in sweeping motions for even, but light coverage. You do not want it to
glob anywhere so that you cannot see the details in the plastic. Tip: paint the
front, back, sides, then lay the piece flat to check for missed coverage. Let them sit for several hours so that they are completely dry!
On to the Painting!

Tear a piece of the card
board box that you used to spray paint for a cheap palette board that you can
throw away when you are done. For these models, I used cheap acrylic paint in the $1-2 per color price range. While more serious miniature painters will recommend much
more expensive paints by wargame companies like Warhammer 40k etc., I found
that these cheaper paints worked quite well, and I didn't have to break the
bank to buy them (some the larger, more "serious" miniature paint
sets cost $50 or more). The paint job with the cheaper acrylics may not last
quite as long, but I do not mind if in the future I have to repaint them.

Here is the paint that I used:
Painting the Figure

Starting with the cape I add a layer of the color green with a bit of yellow added.

I apply a light blue to tunic, I am not being that careful yet, just need to slap it on there.

I decided to make his hair brown, and muddy up his tunic a bit with some burnt umber.

Here is a photo of his brown hair.

Here, I have added the color gold to armor on his arms and knees and more blue to his tunic.

I then put the color silver on his weapons and linen on his face and hands. We are now ready for our wash.
Making Your Own Wash
Pictured below is my secret recipe for washes.
What is a wash? A wash acts like a thin, watery, drizzle layer. It is a
translucent darker color that you put on your figure after you are finished
painting. The darker color gives my Warrior a gritty realism, and the wash flows
into all of the cracks, bringing definition to the details on the figure. If
you have watched my painting videos you know that in an painting you start with
the background, "lowlight" colors first and then add the highlights
on top. Here we are starting with the brighter colors, and then are adding the
background colors last.

So what is my secret recipe???
One Part Water
One Part Dish Soap
One Part Color: Burnt Umber (2-4 drops).
Now if you want, some of the large war game companies, like those that I mentioned before, do sell an official wash that you can buy (costs anywhere from $5 - $35 in price depending on the brand), but I find that the above recipe works just fine for what I am doing. Get whatever works for you. I cannot address the effectiveness of the store bought washes, as I have never used them before.

After two coats of wash the details stand out much better!
Dry Brushing: White
To achieve this stone effect, I take a wide
flat, "Bright" style brush and dip into White paint. I then brush off
the brush onto the cardboard palette to get rid of the excess paint, until only
a little, VERY thin layer is coming off the brush. I very gently brush my
wizard, in the most detailed areas to make the ridges become highlighted.

Front of the Warrior after the white dry brush layer.

Closer photo.
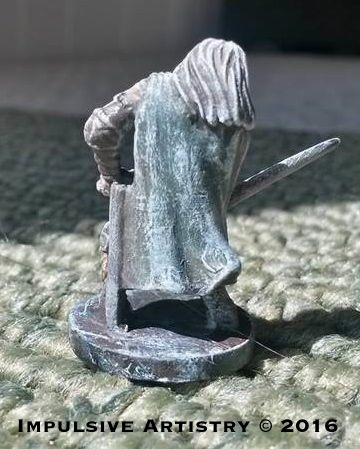
Back of the Warrior after the white dry brush layer.
To protect your minis, be sure to spray them with a layer of clear spray paint that can bond with plastic using the same technique as the black.
Some of the other figures that I painted from Talisman:

Seen above from left to right is the Assassin, Prophetess, Sorceress, and the Druid.
Here are the closeups:


Thank for reading this blog article! I hope that you found it to be of interest as well as informative. If you have any board games with miniatures, consider trying to paint them like I did. Not only is it a lot of fun, but it really does heighten your gaming experience!
If you liked this article, please share it with those you know and subscribe to Impulsive Artistry today! Have a fantastic creative day!
—Charles
Follow this Blog!
Follow Impulsive Artistry at these sites, CLICK ANY NAME TO LINK:
Follow by Email (Feedburner) — get instant updates when each new post is uploaded! Enter your Email Address in the box in the upper right sidebar to sign up! (May not be visible to mobile uses)
Please note that this article contains affiliate/product links to Amazon, see my Disclosure Policy for more information.
No comments:
Post a Comment